Christmas Tree Cupcakes

Here’s a quick post on something I made today. We’re in the midst of craft and bake sales, so November is pretty busy.

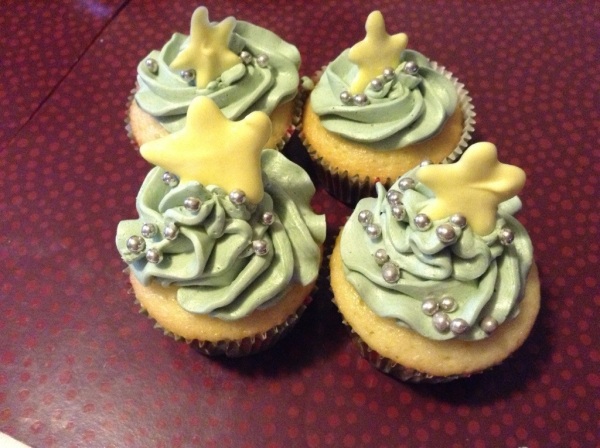
I’ve got a craft sale coming up tomorrow, so I whipped these puppies up. Use whatever cake and vanilla frosting recipe you wish (canned is ok, too!), and then tint your frosting green. I use the Wilton icing recipe, because it tints the best (Check out my ‘Hello Kitty’ post for the recipe!).

20131108-090515.jpg

Put the icing in a piping bag with a star tip (I used my largest one, I think it’s a 20), and go around in circles on top. Add some silver ball decorations (or anything, really) to look like ornaments.

For the star topper, I put some yellow melting chocolate into a piping bottle, and made a star shape.

My big boy is turning 3 next week, and he’s into Spider-Man big time. Stay tuned for a few posts related to that (notably cake decorating and cake pops!).
Christmas Wishlist

I’ve been doing a little shopping for myself.  Well, not really.  Just browsing.  Here are some things that I think are pretty neat:

The Sharp Crochet Hook.  With this tool you can use the crochet hook to go through anything, like leather, fleece, fabric, etc.  You don’t need to pre-punch holes for the hook, either.  Then you just switch to a regular hook, and you’re all set!  I contacted the person who runs the website, and while it is an American company, they ship internationally to places like Canada for only $4.50.

Bakerella’s Christmas Cake Pop book.   If you haven’t checked out her website, you should!  She has the neatest things!

A pretty charm bracelet, because everyone needs something pretty for Christmas!

A half-pound Reese Peanut Butter Cup.  Have I mentioned that I’m pregnant?

What’s on your wishlist this year?

Toddler Christmas Hats

While the little guy and I were watching “Tupty” (that’s Thomas and Friends, for those of you that can’t speak toddler), I finished a few of my Christmas hats.  He was more than willing to model for me!

To get the basic idea of what I did, you can check out the Santa hat for a new born, and my post on a quick elf hat.  For these hats, I used Red Heart Light & Lofty, and a 10mm crochet hook.

Round 1: Make a magic ring and ch 3.  Make 4dc into the ring.  Join to first dc, not the ch3.

Round 2: Ch3, 2dc in each dc. (if making the elf hat, switch colours every two rows)

Round 3: Ch3, *2dc in first, 1dc in second* repeat between * * 3 more times.  12dc

Continue to increase in this fashion for 8 rows (32dc)

If making the Santa hat, continue with red, if making the elf hat, switch to white

Row 9: dc all around

Row 10-12: sc all around with white

I’m still experimenting with this pattern.  I’ll have to do one post once I get it all figured out for all sizes.  Hope you enjoy the pattern!

PS – 50 posts!  Thanks for reading!

Poinsettia Headband

I was in the Dollar Store today, and they had their Christmas decorations out (who am I kidding, they’ve been out for a few weeks now… I’m only giving myself permission to browse now), and I found some poinsettia flowers.  I thought they might make a nice headband.

I also found the metal headbands at the dollar store, too.  First remove flowers and leaves from the stem.  You may need to cut the plastic bits right up to the flower if they stick out a bit.  Glue the leaf to the headband using hot glue, and then glue the flower on top of the leaf.

Ta-da!  I can also spell ‘poinsettia’ like a pro right now…

Crochet an Elf Hat in Under an Hour!

Start to finish… less than an hour.  Granted, it is a little hat, but still!  For the pattern, see my post on the Crochet Santa Hat.

I did make some modifications, however.  I used a DC instead of the HDC (I also ch 3 at the start of each row, not ch 2).  It’s still the same amount of row and stitches, though.

For the elf hat, the first two rows are green, rows 3-4 are red, 5-6 green, and 7-8 red.  Then there are three rows of sc in white.

Using the Dc instead of the HDC made it taller, and floppier, because the stitches are looser.  It’s up to you which one you like.  I like them both!

**As a note, this one does have a bigger circumference.  I’ve only done the one, so I’m not sure if it’s because of the pattern, or because of me, but this one would fit a baby up to 3 months.  But seeing as how it makes up so quickly, I could probably whip out another one tonight and see… or maybe just go to bed.  Good night everyone!

**Edit Nov 5** – I tried this one on little man, who is almost two, and if I really stretched it, it fits him, so I’d say this one would be sized up to 1 year

Make your own money or gift card holders

I’ll be the first one to admit that I like to receive gift cards, especially if it’s for things that we really enjoy, like for the movies or for restaurants that we like to go to.  Here’s a way to pretty them up!

On Monday nights, I’ve been getting together with some friends, and we’ve been making cards.  We learned how to make a gift card holder a few weeks ago:

I decided that I wanted to do some for Christmas, and now you can too!

Step 1:
Cut two rectangles of card stock measuring 5.5″x4.5″

Step 2:
Put the two printed sides together.  If using double-sided paper, put the two sides together that you want on the outside.  Cut a design on the top, including an indent for the recipient to be able to retrieve the gift card or money.

Step 3:
Fold the sides up until they cover the cut edge.  Glue the sides and bottom on the cut piece.  Do not glue the top, because that will make your pocket for the gift card or money.  **Side note** I bought this ginormous bottle of tacky glue at the Dollar Store for $3.  Glue both pieces of paper together.

Step 4:
Cut a contrasting piece of card stock 1″x6.5″ (you can probably get away with using 6.25″, if you wish) and wrap it around the holder.  Glue the paper’s ends together, and cover the seam with a sticker, if you wish.

Happy crafting!

Quick Project! Crochet a Newborn-Sized Santa Hat

I apologize for those of you who think this is too early, but I’m starting on my Christmas gifts.  Through my facebook page, I found a local photographer.  I offered to crochet a Santa hat for her to use in some of her upcoming shoots.  I hope you like it, Tamara!  I’ve mentioned in previous posts that I’m new to crochet, especially making up my own patterns.  I had tried about 4 different patterns before I settled on this one, and once I did, it came together very quickly, in under two hours.  Here is the secret:

Super bulky yarn (Red Hear Light and Lofty) and a 10mm crochet hook, yessiree!

Here’s the pattern I came up with, feel free to make any changes!

Newborn Crochet Santa Hat

Round 1 – With the red yarn, make a magic ring, ch 2.  Make 4hdc into the ring.  Join at the first hdc, not at the ch (it makes for an invisible seam). (4hdc)

Round 2 – Ch 2, and then make 2hdc in each (8hdc – do not count first ch2, just count the hdc)

Round 3 – Ch 2, *hdc in first stitch, then 1 hdc*, repeat between the stars three more times (12hdc)

Rounds 4-7 – Continue in this fashion, adding 4hdc each row until you get to 28.  This should have a circumference of about 13″, if it doesn’t, make one more round.

Round 8 – hdc (28hdc).  Break the red colour.

Round 9 – join the white yarn, and sc all around.

Round 10 & 11 – sc, bind off, and sew in the tail.

If you need to make it longer, you can add more rounds of white.

To finish, add a white pompom to the top.

**Variations for older children – continue increasing until the hat has reached the proper circumference, and then add one more row of red, and then a few of white.

I hope that pattern made sense!  I will get used to writing patterns one of these days…

Make a Tinsel Scarf!

I was at a store this morning, and the sign said “63 days until Christmas!”… but seeing as how today is two months from Christmas Eve, I think it’s actually 61.  Anyway, this means that I am going to start with the Christmas crafts.  I will be selling some things at craft sales starting on November 17th, so I have to get busy.  Anyway, I found this yarn at Michael’s a few weeks ago:

It’s called ‘Festive’ by Loops & Threads, comes in three colours (red, green and silver… maybe more, but all I saw was three), and it looks just like tinsel!  Ah… tinsel… the stuff that you’d cut and wear on your head so you could be an angel in your Christmas pageant.  Or you’d decorate a tree with it… 

However, this stuff is not at all scratchy like real tinsel, it’s actually pretty soft.  And it’s a breeze to crochet, and probably to knit, as well.  I’d recommend using large needles or a crochet hook.  I used a 10mm hook, and I would use at least that for knitting needles.  Here’s my crochet pattern (and please forgive me… I’m not great at patterns):

Tinsel Scarf – use one ball of Festive

Ch 9, skip three ch, and make 1DC each in next 6ch.  Make 3 ch, turn, and DC across.

Does that make sense?  In each row, there is the 3ch that makes 1DC, and then 6 additional DC, to make 7 all together.  This makes a nice long, but thin scarf, so you could wrap it around your neck, or double it and loop it like I did.  Enjoy the tinsel!

Note: for knitting, cast on 6-10 (depending on how thick you’d like your scarf), and knit across each row.